Friday, July 8, 2011

Dr. Zooch Shuttle

I had planned on posting along with every step of the directions in this Dr. Zooch kit.  My lack of an established method or habit in blogging prevented such.  Several times I neglected to take pictures as well.  Sometimes you get into a certain model making zen state and you just forget about the world around you.  It is one of the therapeutic things about building models, but doesn't lend itself to good blogging practices or live interpersonal communication.  If taken to the extreme it can even lead to poor hygiene and identification as the neighbor who "kept to himself".

But on to the shuttle kit.  This was hands down the most difficult model I have ever built.  The balsa wood Hawker Hurricane I built many years ago was close, but this thing was a beast.  The work with tubes and fins was rather easy since that's the stuff that's pretty intuitive for even a beginner rocketeer.  The paper modeling, and creating structures from wood and dowels was the hard part.  Like anything I think that I could have done a better job with more experience, but this is how you get said experience.  The cutting out of balsa parts from paper templates was not too bad since I got some good experience with that on the Ares I-X.  This would have really been a mess if I hadn't taken on that kit first.
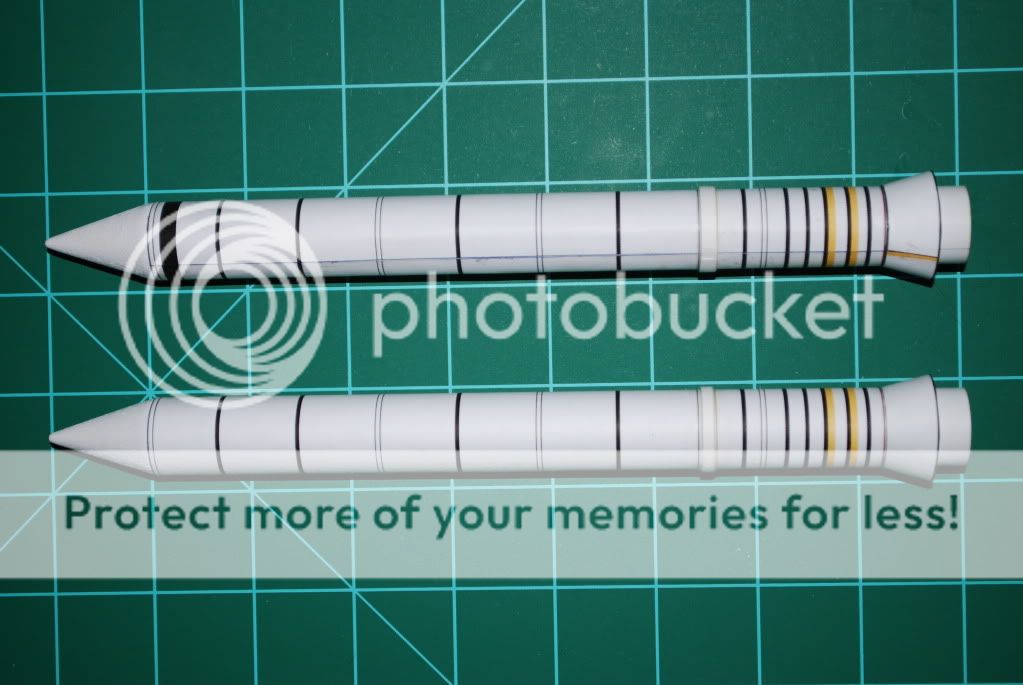
SRBs
These were very simple.  Draw a baseline on the tube.  Roll on the wrap. Paint and glue in the nosecone.  Form the skirt and glue in place.  Easy!  Later on you have the option of putting in a support ring but that is more difficult because it requires a good bit of filing a centering ring at an angle, but being something that was done on the Ares kit was not imposing at all.
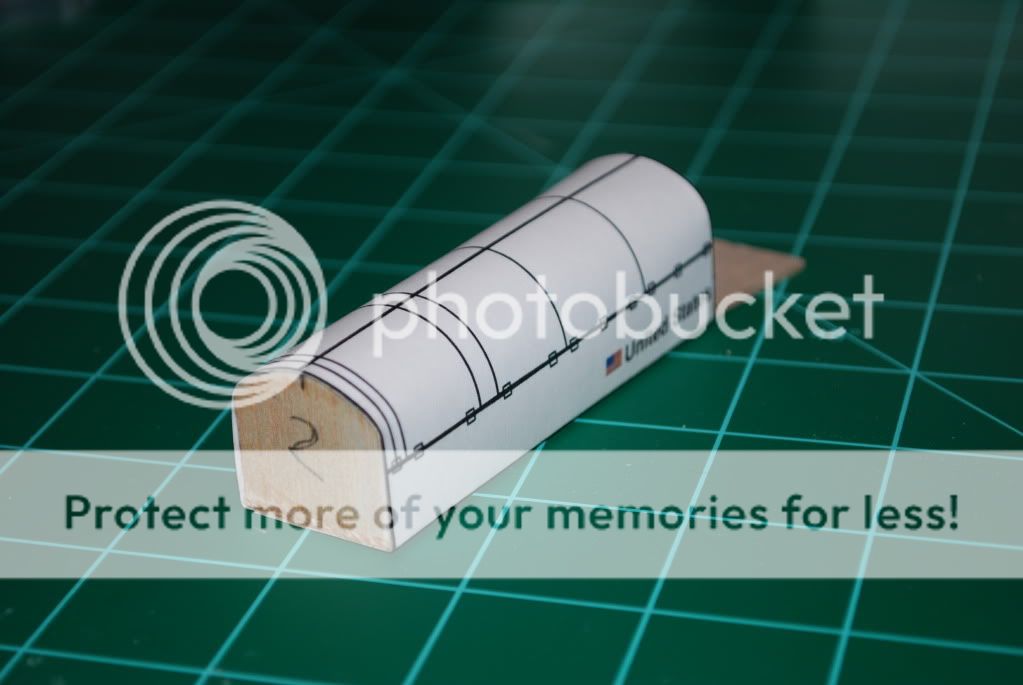


External Fuel Tank
This was the first bit of "They want me to do what?!!!"  The aligning of the nosecone description is quite verbose, but is pretty understandable and not difficult.  The creation of the structure to hold the rear of the shuttle though takes some patience and slow acting superglue.  I'm not sure I could have done it without the ten-second Loctite gel that I got a few weeks ago.  I would pay $20 for a bottle of that stuff.  It is well worth it.  I won't go into detail about the forming of the structure, but I do have to admit that I had to pull it off at least once and I think I even glued myself to it more than that.  Most rockets you build have a piece of you.  If you're using superglue that might be the literal truth.


Orbiter
The directions lovingly point out the this is the difficult part of the kit by stating, "And now the hard part!"  This was paper modeling on a level that I've never done before.  Once again, instead of providing a blow by blow I'll let the picture do the talking.


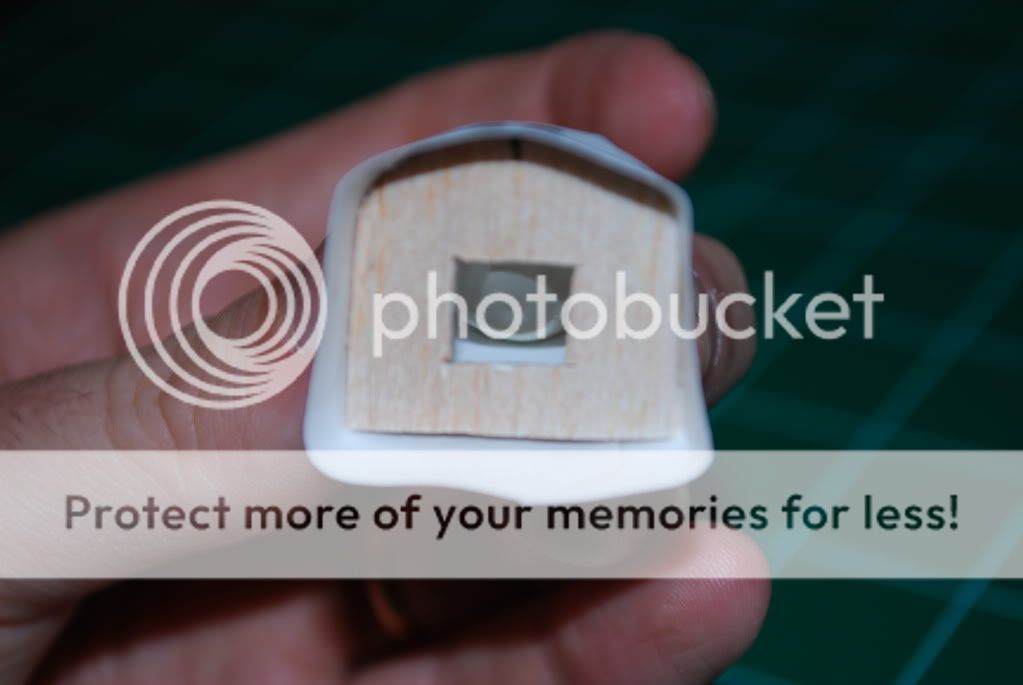
The hole cut here was done to permit the adding of the clay nose weight.  I think the balsa would have been too weak to properly place into position if the hole had been cut earlier and the nose would not have been as strong either.


The underside graphic is a nice touch in this kit.  This is done from a photograph of the underside of the Space Shuttle Discovery.


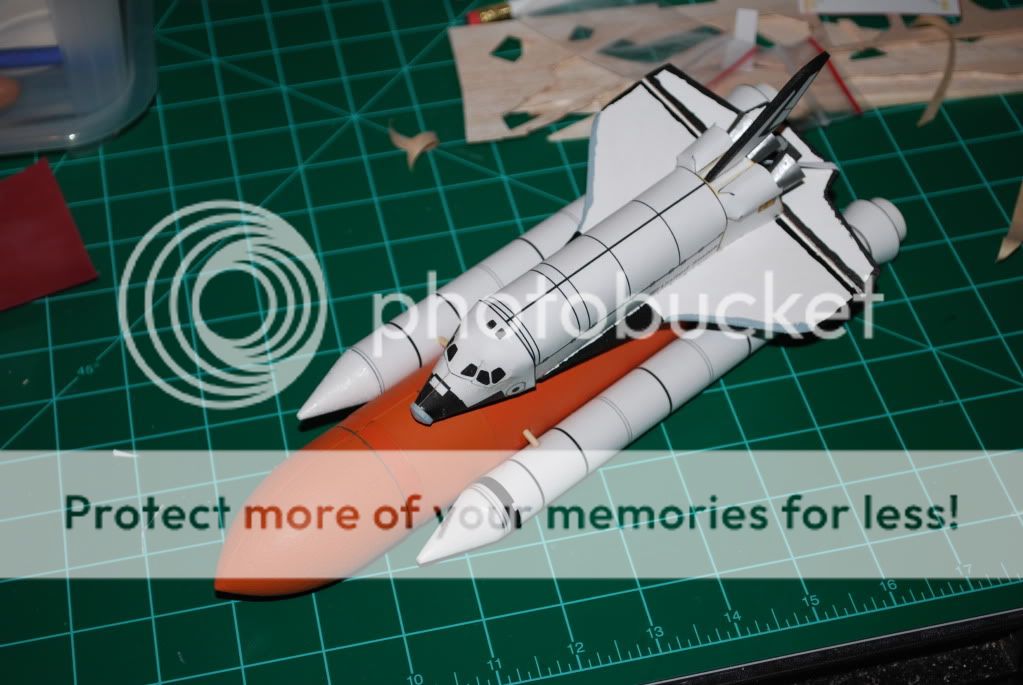
Painting and Assembly of the stack
I had a can of Testor's spray paint in the color Mango that I picked up before I realized that the Quest FLV had a paper wrap.  The color was pretty close to one of the various shades that the External Tank turns while waiting for launch.  One problem was that it was a glossy paint.  This was pretty simple to overcome because I had a can of matte varnish leftover from Warhammer 40k.  But after applying it to the other paper components I discovered that it left a bit too much white residue, especially a problem on black.  The other problem was that the nose cone soaked up paint even though I had treated it with a primer.  The paint was beginning to build up in some areas near the nose cone without the desired effect on it.  So I went through my plethora of paints also left over from Warhammer and found an orange that was surprisingly close and just brush painted it.  This worked passably well, but I should have gone after some sort of sanding sealer.  I need to get a hold of some before I tackle my next kit that has lots of wood work.

The SRBs are then glued along the lines previously drawn in the construction of the External Tank.  My painting obscured the lines and I had to redraw them using the alignment guide.  So be sure to not throw any of the templates away until you're done.  The kit deviates from the real thing a bit with the addition of support struts for the SRBs.  If these were not in place the SRBs would be highly unstable (like Dr. Zooch himself) and weak (like an Estes engine).  The difficult thing with these is that they are only a quarter of an inch long and must be beveled.  I had to hold the dowel piece with needle nose pliers while sanding the bevel.  All gluing for the SRBs was done with the same Superglue gel used on the orbiter rear attachment point.


I tried to trim the orbiter's elevator to the proper level but I couldn't get consistent results since it seemed to behave differently every flight and seemed to be more dependent on how well I tossed it.  I need to try just dropping it off of my deck I guess.

Zooch line.  Upon thinking what will be my next build before summer ends and the academic world sucks me back into the abyss I thought I'd do something with a bigger engine compartment.  But the Dr. Zooch kits are so much fun, and being a historian I'm having a hard time seriously considering something that isn't a scale model of at least a missile.

This morning was the final launch of the Space Shuttle program.  I took the model to my son's pre-school and talked to them about how the shuttle launch stack worked.  We watched the live stream of Spacevidcast until External Tank separation, then ate some of the freeze-dried ice cream that we got at the Air&Space Museum.  Hopefully I can go launch a rocket or two for them next week.

After HEMA class this evening I talked to someone who might be a lead on some more open land than the spillway at the park.  I'm going to go check that land out tomorrow.  Hopefully it leads to something.


Thursday, June 30, 2011

Dr. Zooch Ares I-X

A few weeks ago I told my son a bedtime story about the Estes Space Shuttle glider rocket I had growing up.  My usual stream of consciousness thought process kicked in and I had to check the internet to see if the things were still available.  As I suspected they weren't made anymore, but you could find unopened kits for around  $150 on eBay.  Alternatively, the Dr. Zooch line had something of a similar concept for just under $30 at Apogee.  Being a skill level 5 kit I knew it was not going to be a simple build.  My Quest FLV was a level 3 and it didn't turn out perfect, but the stuff I messed up on was the rather new phenomenon of body wraps.  So I figured to bridge the gap I should pick up a level 4 kit.  Since the FLV is based on the concept for the Ares V I figured the Ares I-X would make a good choice so that I can have my own Constellation Program fleet.

Am I glad I made that choice!  The Dr. Zooch kits are a totally different animal than most kits available today.  For starters the directions are wonderfully sarcastic and written by what appears to be a jaded engineer.  There are no kit specific parts meaning specially designed plastic parts.  Just about every part has to be formed and adapted to fit together or look the way it's supposed to.  There is also a lot of paper modeling which I do not have much experience with.  I learned a valuable lesson with this that I'll take to future Dr. Zooch kits that you should not tape a wrap together when leaving it to dry.  I pretty much ruined the appearance of the graphics along the seam because of that.  But I'm pretty sure a glossy paper wouldn't have done that.

Despite my learning curve the model turned out pretty well I guess.  Another thing I tried was to make initial application of the fins using gel super glue.  This was a very strong bond but I still made fillets of wood glue.  If I lose a fin it's not going to be at the joint.


My son was very impressed and immediately asked when we were going to launch it.  I'm running low on B engines so I asked him what rockets we should launch next and limited the selection to three.  He said we should take the Ares I-X, the Estes Bullpup, and the Porta-Potty.  After going through the engine stock I don't think I could get two launches out of the Porta-Potty, but we could get two out of the Big Bertha I built for his pre-school.  Although if I can get to the hobby store to pick up some more engines that could change.  Interestingly he did not want to launch his pencil rocket.  I warned him that it was a high flier and could very easily be lost on that narrow field we use.  He quite wisely said that he'd rather wait till we can launch it in a bigger field.  He's a smart one!

Our plan is to go to the same park we've been using this Saturday.  I'm trying to work out a time to go check out some land that I could get access to.  If that works out I'll be able to move beyond B engines and start really flying these things!

Saturday, June 25, 2011

Working with wind and an audience

This morning turned into excellent weather for rocketry!  I was rather worried that I would have to limit my launches to the Porta-Pot since it barely gets above the treetops.  We were already entertaining one of my son's friends for the day since his mom had to work.  I then decided to just go for broke and make a big play date out of it and invited one of his other friends and his brother.  I would not have felt safe launching with four high-energy boys around if it was just me, but the siblings' mom accompanied us and did the lion's share of the kid wrangling thus letting me focus on the rockets.  I made the stroller that I brought the gear in with the limit to how close they could get to the launchpad.  I let each of them push the launch button and only that person could go past the stroller.  Having controls like this for kids is very important.  As long as you make them simple they will generally follow them.

I would have liked to have explained to them the physics involved with making the rocket work, but such things are easily lost on those not yet five years old.  I simply explained what you did to launch them safely.  At this age you can focus on the tool and establishing it as something cool rather than clue them in to the principles involved.  I'll work on that as the interest and maturity level grows, but I doubt it will be long.

One thing I did explain was wind.  Today was a good day to showcase its importance.  Yesterday I checked the weather to get a general idea of the weather picture to see if launching was even going to be a possibility.  I saw that the forecast called for 9mph winds by 9am.  9am was going to be about the time that I could get to the field.  10mph is my cut-off for the rockets that clear 300ft.  The field is about 270ft on the shortest side and the winds usually blow along it making for some harrowing flights.  Most of the time the way you deal with wind is to launch directly into it so that the parachute will let it float back towards you.  Since I'm working with a large field I decided to take a slightly different course of action.  My idea was to launch at a 30 to 45 degree angle to the wind so that the rocket would be at apogee over the trees in the direction of the wind.  Then the wind would carry the rocket into the recovery area and hopefully drop below treetop level after clearing those trees.  I ended up not needing this tactic because the winds died down while I was launching the highest fliers that I brought.  I was using first flight engine selections to stay safe.

The Estes Big Bertha took and unexpected turn off the launchpad and looked to be heading into the south side trees, but a fortunate swirl of wind kept it safely in the field.  I prefer to play with fire on the launch, not the recovery!  That flight did well to illustrate what I had been telling the boys about the importance of paying attention to the wind and how unpredictable it can be.  The final launches became a timing issue since the winds picked back up as expected.  I can't complain about seven launches and seven recoveries with the only casualty being one of the new wood fins on the Quest Future Launch Vehicle.  I also figured out a great new job for the stroller frame that my daughter is about to outgrow!

I intended to take pictures, I even brought the camera out there.  Then I promptly forgot to take any pictures.  Sometimes there's just too much to pay attention to!

To top off a great day of rocketry I got some new Dr. Zooch kits in the mail much earlier than I expected from Apogee Components!  I had remarked to the brothers' mom that I had cut too big of a center-hole in the Porta-Pot's parachute.  Lo and behold but Apogee sent me a free parachute with my order!  Tim, I'm not sure if you're a rocket scientist or a mind-reader/fortune teller.

Some time soon I hope to check out a new launch site at a friend's family farm.  He said he also has some land in Bland County, VA.  I hope that one of those locations works out so I can push the current fleet to greater altitude without worrying about whether I'm going to be littering a city park.  I'm not interested in going so far as to get into high-power rockets, but I would like to explore mid-power and aerial videography.  I just can't do that on the current field.  I also got some insider information on some land that my future employer is attempting to acquire.  It may offer a decent launch site.

Tuesday, June 21, 2011

Work, launch, build

Being in the history business you have to do a lot of reading.  I'm getting ready for my first foray into teaching in college so I'm having to educate myself for the course.  It's not a straight history course, well, it's not a straight anything since it's rather interdisciplinary, but having had such an ecclectic life experience so far I'm not troubled by that aspect.  With my most recent studies concentrating on 16th Century German Martial Arts and this course focusing more on 16th to 20th Century science I'm having to do a bit of new learning.  So after starting this blog last night and this morning I went to reading.

But later in the afternoon I noticed that the winds were calm and my son needed some outside time.  So I offered to take him to the park to launch.  He turned me down.  I was given some additional child-free time to get more reading done, but after less than an hour I just had to get outside.

I took the Estes Porta-Pot Shot and the Quest Future Launch Vehicle.  The Porta-Pot is great for small fields.  It's fun with a relatively big sound for something that doesn't go all that high.  I'm finding out another good thing about it (also bad) is that the fins are easily repairable when the glue bond breaks.  I had one fin come off the last time, but this time three of them came loose after the second time of it making a hard landing.  Of four launches I had NO parachutes fully open!  I'm sure if they would have flown over trees or the wind had picked up they would have opened.  Murphy's law of model rocketry must state, "Open parachutes go toward trees, all others move quickly to the ground."  The Porta-Pot made one flight on a B4-2 and another on a C6-3.  The C engine gave a much more satisfying roar (although I realize that these are still tiny engines) than the minis and B's we've been firing.  It also gave it enough altitude to allow the parachute to inflate.  However, it decided to not inflate and instead slammed into the ground loosening three of the fins.  But it's still intact and very easily repairable, so no big deal.

The Quest Future Launch Vehicle made two flights on B6-4s.  Apogee Components suggests B4-2 and B6-2 instead.  I'm going to start trusting them from now on because it took a nose dive and the recovery system deployment was so violent that it had problems both times.  The first launch it spun in a way that kept the parachute from opening, and the second time the shock cord got stuck between one of the solid rocket boosters and the rocket body.  One of the fins broke on the second landing ending my day.  The fins in the kit are cardstock.  I'm not sure why they didn't go with balsa fins, but I'm going to make some.  I'm not sure that it would have made a difference in that impact, but it'll make me feel better.  Those extra two seconds of delay time do nothing but cause problems.

After dinner my son asked to watch some of  Star Wars: The Clone Wars.  I countered with offering to have us build his pencil rocket.  He refused, but relented when I said he could play with the Star Wars toys downstairs.  He helped with the measuring, identifying parts in the kit, and squeezing out glue.  It was apparently my job to smear it in place since he didn't want to get his hands dirty.  Why, I don't know.  The build managed to keep his attention partially.  He managed to find it interesting again after I finished tying in the parachute and shock cord.  All that was left was the sticker, the application which he considers himself a professional.  Although it's crooked I should consider it successful because he sees it as "his" and something we really did do together.

My Reasons for Rocketry

My wife recognizes that I change hobbies like some people change underwear.  Since high school I have gone through cycling, lacrosse, tennis, Star Wars collecting, comic books, Dungeons&Dragons, Magic The Gathering, Taekwondo, Historic European Martial Arts, hunting, Warhammer 40k, airsoft, baseball, hockey, and model rocketry (I'm sure I forgot a few.)  Most recently I've been involved with Historic European Martial Arts (HEMA) and airsoft.  I still love both and even have a dedicated group of home-schoolers that I teach twice a week.  HEMA will not be abandoned.  But airsoft has proven problematic lately.  The unfortunate thing is that I recently hooked up with a team (Echo Company at ETSU) and was hoping to play more often now that graduate school is done and my wife has a little bit more free time since it's summer.  I'm not ready to sell my gear (especially that sweet sniper rifle) but spending the better part of a Saturday away from the family has become a bit of an undue strain.  My fantastic wife recognizes that we each need to have time to do things on our own, but the kids aren't as forgiving.
My son is about to turn five and is showing interest in the same sorts of things that I like.  We frequently watch Star Wars related stuff and play with the toys.  He likes swords and learning about knights, and he's turning into a fierce grappeler as well.  But he's too young to be allowed onto the airsoft field, and will be so for some years.  So I thought about what sorts of things I could do as an outlet independent of my budding academic career that I could involve him in to a certain degree.  Model Rocketry seemed like the most viable option.

I already have the necessary field equipment from my last foray back into the hobby when the boy was a baby.  I built and flew many rockets when I was growing up, so I already have a knowledge base enough to be able to teach him and be able to figure things out for myself if need be.  I have two Estes launch pads and controllers that allow me to launch anything up to E engines.  With my other recent model building experience in Warhammer 40k I've developed better skills with paints than I ever had in high school.  What I didn't have was rockets or a place to launch them.

It's MUCH cheaper than airsoft.  Even the most complicated kits rarely exceed $30 with most being in the $20 range.  The most expensive kit I've ever seen was the Saturn V from Apogee Components that's still not $300.  $300 can get you a passable airsoft gun that will still need some upgrades (although I'm not likely to lose an airsoft gun in a tree.)  Most of the single-use engines that I plan to use are less than $5 each.  The price has increased significantly in recent years, but I can still get a lot of launches out of $20 if I stick to the small stuff, especially the 13mm engines.

Although I'm at the mercy of the weather even more than with airsoft I still have something I can do that is hobby related if we can't launch.  I can build or go to the hobby store.  Either of these are things that my son and I can do together, although taking him into any store is getting to become more and more of something to be avoided unless he can buy something. (Although he thankfully doesn't have nearly the meltdown that I've seen some kids have.)  But going to the park where I've gotten permission to launch is the real payoff.  We can either have a boys' outing or take Mommy and baby sister along.  Being that there's a playground nearby makes it all the better for a family outing.


Two weeks ago was the first time I took him to launch.  It was quite a walk to the field because I wasn't entirely sure of the best route.  He was pretty tired by the time we got there and was asking to go back to the car even as I was setting up the launchpad.  But once the first rocket went up he was hooked.  That outing was followed by a trip to the Smithsonian Air&Space museums (yes, both of them!) when we accompanied Mommy on a work related trip to Maryland.


We'll see how his model building skills develop.  With many of the current crop of kits using stickers instead of water-slide decals he has something that is within his grasp.  He has done a bit of gluing with white glue too.  On our trip we stopped by a hobby shop and he picked out his "pencil rocket", the Estes Sky Writer.  I really wanted him to get a lower altitude kit, but it is something that he can do with supervision.  Hopefully I can get access to some land with enough open area to launch it.

So I've embarked on yet another shift in hobbies.  But this time I think that the shift will be better for my son both in being something that excites his imagination, makes use of science and math, and gets us together to do something will hopefully become "ours".  It'll also keep me around more which should make Mommy happier.  When you have a family you have to make choices that accommodate more than your selfish desires and concerns.  We should all do the occasional activity that makes us happy or clears our head, but too much causes strains in the most important relationships that we have, those with our spouses and children.


This blog is going to run the gamut of rocketry related topics.  Topics likely to come up in addition to build and launch reports will be land access, rocketry with kids, science education, and history.  I recently completed my MA in History (albeit with a focus on Early Modern Europe) so I'm going to try to include some book reviews at the very least if not a full-fledged study of some sort.  Right now I'm working on a book about Robert Goddard that looks to be quite good so far.

I hope you enjoy the ride.

Ignition sequence start!